Thursday, October 25, 2012

Isn't Life Bootie-ful?

I have been spending a lot of my time lately trying to figure out how to get people interested in Stamping. It's a hobby that I love, I really wish more would get into it! Since becoming a Stampin' Up! demonstrator I have struggled and struggled with workshop attendance and meeting my $300 minimum order requirements. When I get stressed out or discouraged I do something to try and take my mind off of it. I with either knit and watch I Love Lucy, or Stamp and watch I Love Lucy.. Lucy seems to be a running theme. I have made many different things now since I have started knitting. I have done hats, cowls, and blankets. The one I am working on now is probably my favorite of all of my knitting projects I have ever done!


It's not a great picture, but it's what I've got right now. Its cable knitting and extra wraps. I love it! I will probably make another one with this pattern and different colors. Now on to the reason I made this blog post in the first place! I have fallen in love with the new stamp set from Stampin' Up! Bootiful Occasions!

I sat one day and just made a series of cards using this set. The more I created the more I fell in love with it! It's just so versatile! I made Halloween, spring fever, and Christmas cards with it. I love it!

Fancy Witch Card

If the Shoes/Hat fit!

Let the Sun Shine Card

Red Glitter Boots Card

Blue Winter Booties Card

Best part about these cards is that they were super easy to make! I love creating new things. If you can figure out how I can get more people to attend classes or order from me please share your tips!! 
   

Saturday, September 22, 2012

There's a new baby at someone's house.

I love being 25. This is the age that all of my friends and family (my age) are having babies and getting married. Things have been utterly crazed in my life for the last several months. With substitute teaching that I started in February, followed by a crazy busy summer, and then getting back into the swing of things this fall, I have definitely fallen behind on my blog. I would like to get back into it though. After almost not reaching my quarterly goal with Stampin' Up! I realized I needed to get back into blogging and getting new followers. 

I have started a love affair with Pinterest in the last few months... It brought me to another hobby that I have taught myself and successfully honed since March. Knitting. So when I found out that one of my good friends was having a baby boy right around the start of football season I knew exactly what to make her. A football shaped cocoon and matching team color hat. They went quickly and easily. 


The best part about making this was the reaction she had when she opened it up. This is the first thing that I have made that I have been able to give to someone. Before this I have just made stuff for myself because it took me so long and I worked so hard, I just could't bear to give it to someone else. 

I taught myself how to knit by watching knitting videos on YouTube, anything I didn't know how to do, I looked for a video! 

But with this gift I had to make something else, the thing I started this blog to share... a card. :)

I used Early Espresso, Pool Party, and Whisper White. I put the Pool Party into my dots embossing folder, and stamped the feet from Baby Prints . I added some dotted brown ribbon to complete the look.


 All in all I think it was a successful gift. I can't wait to see her little guy all tucked inside of this football and hat. 

I love making cards and showing what I can do. If you do too then follow this blog, if you know people that do, send them my way!! It's a great hobby, it can sometimes be expensive, but it's always worth it to see the look on people's faces when you hand them a home-made card or gift. 

Monday, March 5, 2012

Birthday Cards Class


This Thursday I am having a Birthday Card Class. I am very excited. I made 2 masculine cards, 2 feminine cards, and 2 child's birthday cards. They all turned out so nicely.


This card was my first Masculine one for the bunch. I used the DSP Beau Chateau, cut it into 1 1/4 inch squares and rounded the corners opposite of each other. The card base was done in Cajun Craze, with a piece of Whisper White on top and Happy Birthday from Curly Cute stamped in Cajun Craze. It's not overly masculine but it's manly enough that a guy would (I think) appreciate it.


This is the second Masculine card of the bunch. I cut the base of the card from Cherry Cobbler, long ways 11 by 4 1/4 and folded it so the crease was on the left side. I added a piece of Whisper White on top cut to 4 by 5 1/4, and added a small Cherry Cobbler strip cut to 1 inch by 4 1/4 inches. The last bit of paper added was the beige and white stripes from Pocketful of Posies cut to 4 by 3/4 in. I then stamped the birthday selection from Delightful Dozen on the front in Cherry Cobbler.


Sadly I cannot take full credit for this card. I got the main idea of it from Pinterest. I used the flowers from the Sale-a-bration set Fresh Vintage. The crisp look of the black in the white made this a very elegant card. I stamped the Happy Birthday from Elementary Elegance and then punched it using the Curly Label punch. I then added it to the front. Crisp clean and beautiful.


This the second feminine card that I created. I used a 1 by 5 1/2 inch strip of each So Saffron, Pool Party, Concord Crush, Melon Mambo, and Pear Pizzazz paper, and scallop punched the edge of each. I adhered them to the front of a Whisper White card base and stamped Happy Birthday from Create a Cupcake in Pumpkin Pie.

This is one of the child's cards that I made for the group of Birthday Cards. I used one of the pennants from Pennant Parade and made it into an ice cream cone using Early Espresso ink, I then used the cupcake top from the Create a Cupcake stamp set and used 3 different "ice cream" colors to make a tall cone. Added the cherry on top and adhered the white onto a piece of Pool Party. I took the Whisper White card base stamped Happy Birthday from Create a Cupcake in Melon Mambo and ran it through the Big Shot with the Perfect Polka Dots Impressions Embossing Folder. I finished by adding the ice cream cone to the front.


For the last card of the bunch I made a River Rock base. I cut a piece of Whisper White and punch 4 1 1/2 inch circles from Lucky Limeade, Pacific Point, Real Red, and Pumpkin Pie. I then punch 2, 3/4 inch circles from each of the colors as well. I placed them about in a pattern I liked, stamped the corresponding color star (from Pennant Parade) and stamped the sentiment Wish Big from Pennant Parade and ran the whole thing through the Big Shot with the Perfect Polka Dots plate. I adhered it to the top of the River Rock base and it was all done!

These are the 6 cards that we will be making on Thursday!


Saturday, February 18, 2012

Free Class Thursday!

I have been trying to do, once a month, a free class for all of my wonderful Stampin' Up! Customers! We usually make 3 cards and 1 3-D project (usually involving some kind of chocolate!) This month was a little bit more difficult for me to come up with wonderful projects that my girls would love to make. I finally used some unconventional materials and different card layouts and came up with a wonderful array of projects for them to make. I think they turned out quite fabulously!!

Our first project used Poppy Parade, cut to 3x5. I then scored it at 2" and 3" so that I had a 1" base in the middle to add 3 Hershey Hugs for our 3-D project. I stamped the flowers all over the paper using the Create a Cupcake stamp set. For the top I scallop circle punched a piece of black paper. I punched the corners with the ticket corner punch, adhered the black scallop, put 2 holes in it at the top and then tied a black ribbon through them to make it look like a small clutch purse!


For our second card of the night we used a certain a la carte stamp that fits perfectly well with what is currently trending, Many Mustaches! I bought the stamp and could not figure out what to do with it. Since it comes with 4 mustaches on the stamp, it was difficult to come up with an original minimalistic idea for a card. But I cracked it! I used Pear Pizzazz cut to a half sheet of paper (5 1/2 x 8 1/2) then folded it in half. I then cut a piece of Whisper White to 4 x 5 1/4 and stamped the mustaches in Early Espresso to the left of the piece and then the word "Hello" from Elementary Elegance (a wonderful new Sale-a-bration set!!). Simple and still fun!


The next card was fun to play around with. I used 3 different stamp sets to achieve this next card. It takes a little while for me to come up with fabulous new ideas for cards because I only have a few current stamp sets that I can use for Stamp Camps! But that's beside the point, lets get started with this one! I took a piece of Pool Party, cut it to 4 1/4 x 11, scored it at 5 1/2. Folded it. I took the word window punch (and now pay attention to this!!) I flipped it over, and lined it up on the front bottom left corner of the card so that the paper was flush with the bottom cut line, and it wouldn't cut the leftmost curve of the punch. I then repeated these steps on the right side, only difference is I didn't cut the rightmost curve. This will leave you with a small catch for a closure. Flip the card and make a punch with your word window for your catch to slip into so that your card will close. Punch it in the middle of the bottom-most section of the card about a 1/4 of an inch from the bottom. NOW! Since the card base is all ready to go, its time to make the layers and stamp! Cut a piece of Real Red 4 x 4 7/8, and adhere it to the Pool Party card, next take a piece of Whisper White and cut it to 3 3/4 x 4 5/8. Now here is the fun part. Take the small pumpkin from Jack of All Trades, ink it with Real Red and stamp it about a half an inch from the top of the Whisper White paper. Next take the dotted cupcake bottom from Create a Cupcake, ink it in Soft Suede, and stamp it about an inch from the bottom of the Whisper White. You want to make sure that you have enough room for your greeting. Take your Pool Party marker, and draw 4 lines connecting the Balloon to the basket of your hot air balloon, take the curly vines from Jack of All Trades, ink in Pacific Point and make a line across your balloon. Finally ink the word Congratulations from Curly Cute, in Pacific Point and stamp it at the bottom. Adhere your White to your card and Voila! You are finished!


For our final project of the night we made a very lovely Birthday Card. I used Whisper White as the card's base, cut a piece of Basic Gray to 4 x 5 1/4 and used the Big Shot Embossing Templates to emboss Elegant Lines (or Swirly Doo's as I called them all night). I used the Create a Cupcake punch and punched out an Early Espresso base, and a Blushing Bride top. I stamped the sprinkles in Blushing Bride on the frosting of the Cupcake, and adhered them to the bottom right hand corner of the card. Next I stamped "Happy Birthday" from the same stamp set in the open spot in the upper part of the card. I did this in Basic Gray. On the inside I stamped "There's something special about your birthday, must be you." Again, your card is finished :)

If you liked any of what you have seen here you can order Stampin' Up! products through me at hilaryreid.stampinup.net. You can also order these cards already made by finding me on Facebook, http://www.facebook.com/pages/HER-Cards/104257022283

Monday, January 23, 2012

New Year New Look!

My great friend totally hooked me up last night. She spent 2 hours with me redoing my whole blog! It looks fantastic!! I have been working on a lot of new things over the last few weeks and I can't wait to start posting about it. I have a wonderful Valentine's Day class on February 2nd at 6:30. Here are the designs:

Sunday, October 9, 2011

My October Class List!


Here it is! My October class list, to make it bigger, just clicked on the picture!


Friday, September 23, 2011

Fall Leaves Tree


I made this beautiful card for our SUO Challenge using fall colors. I love using this set for just that. I have made countless projects using these trees because they are so versatile. My favorite use for this set is with my students. I use it to make a 4 seasons picture as the culmination of a Seasons Unit. They love to play around with the leaves and make them different colors.

I used a white card base, with Pumpkin Pie cut to 4 x 5 1/4. On top of that I used confetti cream cut to 3 3/4 x 5 with the tree stamped in Chocolate Chip, and the leaves stamped in Pumpkin Pie, Really Rust, and So Saffron. The bottom piece is Naturals Ivory, scallop punched and rubbed with Chocolate Chip, I used the same color ink to stamp "In everything give thanks".


Friday, July 22, 2011

Next Class Idea... CHRISTMAS!


I made this beautiful tri-fold card yesterday using some beautiful (retired) Stampin' Up! paper and a current Stampin' Up! stamp set. I was in a bit of panic mode yesterday when I realized that I didn't have very many current stamp sets that could be used for classes. So I decided to do what I could using what I had (which wasn't much!). I made this card as basically a try out to see what fun stuff I could come up with. I ended up falling in love with it, and I will have a class in the next couple of months doing (a variation of) this card. Maybe we'll make a couple? This will be a paid class! Too much work for it to be a free one!

Here is the finished product:

Thursday, July 21, 2011

Another Class Blog

Here it is everyone! Yet another (paid) class I will be having in the near future! However I cannot take full credit for this project, I found it on a blog that I like. Thank you to Paper Pleasing Ideas! It is a gorgeously creative project! It's called a mini accordion album. It's a beautifully creative and fun project :)

Here are some picture teasers!


I can't wait to teach you all how to make this fantastic scrapbook project!!
It was so much fun for me, I know everyone who signs up for this class will have a great time too :)

Wednesday, July 20, 2011

Explosion Scrapbook

Yesterday I became a Stampin' Up! demonstrator! I had to much fun looking around at all of the great tools and tips on the website that I am now a part of! I love everything that I have seen. However I did not see this project on Stampin' Up!'s website. I found this tutorial on StumbleUpon.com Its called an Explosion Scrapbook!! I am only going to show a few pictures for the project right now seeing as how I would love this to be one of my classes I do for my customers!

Here's what you do:

Start of with 3 pieces of white 12x12 paper,
and I end up with them looking like this...


I then take 2 pieces of Designer Series Paper, and cut them to 9 1/2 x 9 1/2",
and fold all of the corners into the middle and adhere them down...


Attach the covers to the front and back of the white papers, along with 24" of ribbon. (I'm being very vague and sneaky huh?)


The final product with look like this:
and this...


SO what do you think? Want to learn how to make this?

Wednesday, July 13, 2011

Baby Boy Birth Announcement


I just finished all of these gorgeous announcements for a friend of mine! They were a lot of work, but turned out beautifully. I used both dark and light blue paper, with a striped DSP. I added a bright green ribbon and stamped the feet in green, and the "i'm here" in a nice complementary light blue. I took the brass dry embossing template that had circles all over it. I spent HOURS dry embossing every circle on every announcement. I also love the fold of this too. I learned it when making a hot chocolate packet holder. I just flipped it over!


The dark blue one is probably my favorite! I think that it looks just adorable. Best part of it all was seeing my friend open up her announcements. She loved them! Nothing makes me more happy than seeing a customer's face when they open a card or mass order I have created. I love all of these cards so much, I put a lot of time into each of these cards!


They all turned out so nicely, I have had a lot of others request this style as well.
Sadly I think twice about it, that dry embossing is rough!


Finished products...

Friday, July 8, 2011

Anniversary Card


I decided to crack out one of my favorite sets this weekend! Haute Couture, makes the most beautiful wedding and anniversary cards. This particular card that I made today is using Haute Couture, Ballet Blue paper, a retired DSP, ivory ribbon, and pearls. This is meant for husbands to give to wives. It's just gorgeous if I do say so myself. So much dimension. Not to mention its absolute simplicity. Time to add it in for SUO Challenges.

Friday, July 1, 2011

Finally

I am so happy that graduation is finally over. I have completely fallen behind with orders. The other hard part is that we don't have air conditioning in the house so all of my paper is ripping when I cut it because of the humidity. However I am so happy that things are starting to settle down a bit. The last month, and next 2 weeks are still so busy. Having finally learned my lesson with orders I have drafted my lovely customer letter for mass orders. I just wish I didn't have to keep having "learning experiences" with my business. I am very excited to get started on things that don't involve graduation though! My true passion of birth announcements and invitations. I love creating new and beautifully classic cards. I like adding subtle hints of shimmer, or classic elements of pearls or ribbon. I always want to be proud of what I put my name on. If I am not happy with it, I don't send it. I will come up with something different before I put it up on my website. Isn't that how it should be though? If you want to have a successful business you should be proud of and love everything you send out. Personally I take pride in loving everything I send out, and detailing it to perfection. I have to do what I can to make not only myself but also my customer happy, and that is something I seem to be having difficulty with as of late. It feels like I love everything that I do, and no one likes what I send. I guess you win some and you lose some. But still at some point you have to wonder if it's worth all of the aggravation. I guess on the bright side, I am getting my name out there and I just hope it is in a positive way.

Wednesday, May 25, 2011

Assembly of a Reception Invitation

Here we go, I decided to take pictures of the whole process of the assembly of an invitation!

Picture #1:
These are the stacks of papers cut to size


Picture #2:
This is the black piece. It is cut to 4 1/4" x 5 1/2".


Picture #3:
This is the Ivory piece, cut to 4" x 5 1/4" and sprayed with glitter spritz spray.


Picture #4:
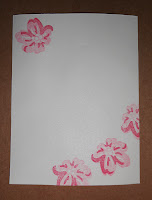
This is the first start with stamping, I used a light pink first
for the first dimension of the
flower for the top and bottom corners. This is a 2-step stamping set. I
always start with a light color and add a dark one on top for the dimension
factor.


Picture #5:
This is a picture of the next layer of the 2-step stamping adventure. This is the darker color on
top to give it the shading on a cherry blossom.
I love the look that it gives it, but we are not done yet!


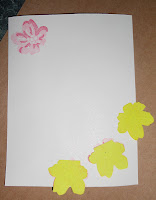
Picture #6:
This picture shows a technique called "ghosting". You use post
-it notes and stamp up near
the adhesive part of the note.
Cut around the image and cover the corresponding image on the
card.


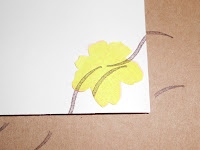
Picture #7:
This pictures shows what you do when you ghost! Stamp over the post it and it protects what has
already been stamped!


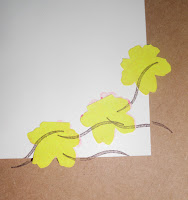
Picture #8:
This is what it looks like when the post-it ghosts are taken off.


Picture #9:
Here is the piece with the sentiment stamped on it! Only one more step to go!!


Picture #10:
Here is the finished product with the layer of black behind the ivory! It's complete!

Monday, May 23, 2011

Update on Progress

I have been working tirelessly on these wedding invitations for my cousin. They are coming along nicely! I will post pictures of them all in my next post. I had a few hiccups in the process, like finding out after I made my samples that the paper I used was all retired. Then I had to go through eBay, Amazon, Archivers, Hobby Lobby, and Michaels to match what I needed! Whew that was a close one! But luckily I got everything and they are looking like perfection! I am so excited to be able to use my new service for her invitations as well, CUSTOM PRINTING! (*Had a few hiccups with that too!*) Like all new things, they have their bugs that need to be worked out. I can't wait to get some new custom printing orders in so that I can create a beautiful new array of samples for my loyal customers! <3

Friday, May 13, 2011

New Services for HER Cards! Find me on Facebook!

Hello to all of my lovely friends, and followers! I want to keep you all updated on the new service I will begin offering next week! CUSTOM INVITATION PRINTING! For en extra $.50 per card you can get beautiful custom printing in any font you choose! Just look me up on Facebook: HER Cards, to see all of the fonts I offer. It's a great way to get that extra little something on the inside of your invitations! I have tons to choose from!

Thursday, May 5, 2011

Butterfly Mother's Day Card


Well I made this card for my mom for Mother's Day. I saw that the challenge this week was to incorporate butterflies so I decided to use one of my other favorite retired sets "Bold Butterfly". I used a lot of retired paper and ribbons, this whole card is pretty much a retired items festival!! The base of the card is done in Naturals White, then a layer of So Saffron, 2 different DSP, one pink then a green, I used the small scalloped circle punch and layer it behind the butterfly I cut out. On the Butterfly wings I used the rock and roll technique in coordinating colors to tie it all together. I then used pink scrunched ribbon from an old mini catalog stock I had and a green grosgrain ribbon on top of it and put it all together. I hope that she likes it!

Wednesday, April 6, 2011

Wild About You Tag Card


This card was soooo much fun to make! I used 5 different colors and coordinating paper. Handsome Hunter, Yo-yo Yellow, Only Orange, Basic Black, and Brocade Blue. Stamped the image and punched with the small tag punch, the punched the coordinating color with the large tag punch. Used Tempting Turquoise as my base, and added a layer of white on top. I then adhered the tags randomly, and stamped a little bird on a couple of the tags. At the end I stamped Wild About You with the little bird on top! It was such a cute card! I love this card!!


Tuesday, March 22, 2011

SUO Challenge #15 Birthday!


SOooooOOO I won 3rd place last week on SUOChallenges.com!! I hope that I can do better than that this week with the card! I used the Sweet Treats stamp set for this, stamped the cake on watercolor paper and used a watercolor marker with stamp ink to color it. I placed it on a piece of orange cardstock and popped it up with pop dots. I used white for the base of the card, a strip of orange, then a strip of coordinating patterned paper on top, then placed the popped up cake on top of that. I stamped "They say it's your birthday!" in the corner and VOILA! Beautiful Birthday Card! :)

I came in third place for my card on SUO Challenges!!! Yay!! It was was SO much fun to create that card!! Thanks SUO Challenges!